 The Basic Rotations (two-man)
In the article Start Positions (two-man), we pointed out the correct start positions for the field umpire (U1) for each of the base-runner configuration – A, B, or C. This represents the position of U1 at the time of the pitch. The instant that a batted ball is put in play, however, the umpire goes into motion. That is, they initiate the appropriate rotation.
In the two-umpire system, there are three start postions (A, B, and C); then, from each start position, there are two basic rotations: one for a batted ball to the infield, and a second for a batted ball to the outfield. In sum, then, there are just six basic rotations in the two-umpire system.
Of course, there is a bit more to it. There are subtle variations on the basic rotations, but for now, let's just grasp the fundamentals. That get's you 90% of the way to proficiency.
Here are the six rotations:
- U1 in A. Ball to the infield (no runners on)
- U1 in A. Ball to the outfield
- U1 in B. Ball to the infield (R1, or R1 and R3)
- U1 in B. Ball to the outfield
- U1 in C. Ball to the infield (all other base-runner configurations)
- U1 in C. Ball to the outfield
1. U1 in A (R0) – Batted Ball to the Infield
With no runners on base, U1 is starting in A. On a batted ball to the infield (presuming a play at first base), the umpires rotate as follows:
Base Umpire (U1)
- Step into fair territory and establish a good view of first base. Be sure to look at the fielder playing on the ball and be sure to see the fielder's release. Now focus on first base. See the runner's foot hit the bag and hear the ball hit the glove.
- If there is an error or an overthrow and the runner advances toward second base, you must stay with the runner. If possible, work you way inside the basepath, being careful, of course, not to interfere with the runner or fielders. You want to get yourself inside because if you're outside the basepath and the runner continues toward third, you're screwed. If your partner is good, though, he'll see your dilemma and work his way up the line toward third, just in case.
- If a batted ball down the first base line passes the front edge of first base, you then own the fair/foul call. You will make this call before going into motion.
Plate Umpire (PU)
- Clear the catcher and trail the runner about half way to first base. You're watching for three things, primarily: (1) Pulled foot by the first baseman; (2) swipe tag; and (3) running lane violation.
- If the batted ball is down the third base line, straddle the line and get the fair/foul call; then turn your attention to the batter-runner. If the batted ball is down the first base line, you own the fair/foul call up to the bag (U1 in A has fair/foul from the bag and beyond). You are also watching for interference on the batter-runner being touched by his batted ball.
- If there is an overthrow at first base, watch for the ball going out of play. That call belongs to you.
- Keep an eye on the ball as it's fielded and (this is important) see the release of the ball on the throw to first. Once the ball is released, switch your attention immediately to the runner.
With play complete, PU will return to his position behind the plate and U1 moves to the B position. Important: While moving to your new positions, do not turn your back on potential plays. Stay with the ball, but stay aware of the runner.
2. U1 in A (R0) – Batted Ball to the Outfield
U1 starts in A when there are no runners on base and stays with the runner all the way to third, should he go that far. On a batted ball to the outfield – whether on the fly, line drive, or grounder through the infield – U1 should rotate as follows:
Base Umpire (U1)
- From A, break inside the basepath and pivot such that you observe the runner's touch of first base and are ready to stay with the runner if he advances to second.
- If the runner advances toward second, you stay with the runner from your position inside the basepath. Be sure to stop and come set before any play on the runner at second, should that occur.
- If the runner is stretching for a triple, you have the runner into third. Again, if there is a play on the runner, be sure to stop and come set for the call.
- When advancing with the runner, don't get too close to the basepath. For one thing, this shortens the distance you need to travel to stay with the runner (who is no doubt much faster than you are); second, you can typically get a better angle on a play at second or third if you are well inside the base path. Remember the axiom: "Angle over distance."
Plate Umpire (PU)
- When U1 comes inside to cover the runner, the PU has catch/no-catch. Clear the catcher and move to a position in the infield that gives you the best view for the catch/no-catch call.
- After the catch/no-catch call, return to point of plate in the event the runner comes home. When moving back to point of plate, however, do not turn your back on the play. Instead, cross-step your way to your new position.
Caveat: If the fly ball to the outfield is in right field and the right fielder is moving toward the foul line, U1 does not come inside to take the runners. Instead, he "goes out" – that is, he turns and takes the fair/foul and catch/no-catch on the batted ball. The PU must key off U1 and, if he goes out, the PU must take the runner all the way.
With play complete, U1 moves to the B position. Stay with the ball, but remain aware of the runner. Always be vigilant.
3. U1 in B (R1 / R1, R3) – Ball to the Infield
We have a potential double-play situation. Unless the fielder errs, the first throw from the infield is probably going to second for the front end of the double play. U1 has both runners; however, PU has the illegal slide or interference by R1 at second base (because U1 has already turned for the play at first). If there is an overthrow and runners continue to advance, U1 has all runners at all bases while PU retreats to point of plate.
Base Umpire (U1)
- Stay chest-to-ball. Let the ball turn you, first to the infielder fielding the ball, and then to the play on the runner (probably at second). Don't anticipate the throw; rather, let the ball take you to the play.
- In the event of an attempted double play, after calling the out (presumably) at second, take a couple of steps toward first as the ball takes you there. But be set (no longer moving) for the play at first.
- Watch for an illegal slide at second if you can, but if the ball beats the runner, stay with the ball going to first and let the PU watch for the illegal slide.
- In the event of errors or overthrows, stay with the batter-runner. The PU will stay with R1.
Plate Umpire (PU)
- Clear the catcher and moves to a good vantage point to watch R1 for an illegal slide, obstruction or interference at second base.
- If errors in the field cause R1 to advance toward third, hustle up the line to get the play on R1 at third. Stay with R1 if he continues home.
- If R1 does not advance to third, return to point of plate.
4. U1 in B (R1 / R1, R3) – Ball to the Outfield
Now we have runners on base and a batted ball to the outfield. So in addition to covering the base runners, we now have to also cover the catch/no-catch in the outfield. Since the catch/no-catch comes first, let's talk briefly about handling the catch/no-catch call.
In the two-man system, U1 has all catch/no-catch calls in the cone. The what? I said, the cone. Here, take a look:
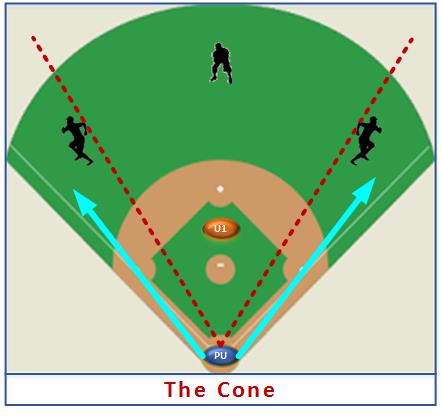
The Cone: The cone is defined by straight lines that run from home plate to the positions taken by the left and right fielders. This creates a big slice of pizza that U1 owns. Any fly ball inside the cone, where outfielders are moving forward, backward, or away from the foul lines, belongs to U1. Any fly ball to the outfield that has either the right fielder or left fielder moving toward their respective foul lines, belongs to the PU. On a ball going to the lines, the PU must call off U1 by verbalizing "I've got the ball!" (on the third base line) or "I've got the line!" (on the first base line).
First-to-Third Situation: Another wrinkle: With a runner on first (R1) or runners on first and third (R1, R3), a ball to the outfield puts you in a first-to-third rotation. That is, if R1 goes all the way to third, then the PU has the play on R1 at third base. U1 stays with the batter-runner while PU picks up R1 at third base, then stays with the runner if he goes home.
With a batted ball to the outfield, the rotation with U1 in B changes significantly. Because we're in the first-to-third situation, the PU has to cover R1 at third base. That's not much of a problem if you have only R1, but if you both R1 and R3 it's a bit trickier because the PU not only has R3 touching home, but must then hustle to third in case R1 comes that far.
Now, with R1, R3 and a clean hit to the outfield, R3 is going to score. That's a given. Nevertheless, it is imperative that the PU see R3 touch home. To do this, first move a few steps toward third base, then pause to see R3 touch home, then bust ass up the line to be ready at third in case R1 comes. Of course, if you don't have a runner on third (R1 only), then you can move directly toward third on the hit.
Caveat: We said in our section on "The Cone," above, that when the PU takes the catch/no-catch/fair-foul call on a fly ball down the line, he shouts out "I've got the ball!" (on the third base line) or "I've got the line!" (on the first base line). You may have asked yourself, why two different verbalizations? Because in a first-to-third situation on the third base side, the PU can straddle the foul line, make the call, and still continue to third if needed. However, if the fly ball is on the first base line, then the PU is up the first base line and cannot get to third base for a play. So his call on the first base side, "I've got the line!," is his way of telling his partner that he's away from the line. The question, then, is who has the tag-up at third when the PU goes to the 1st base line for a call in right field?
This is important: With a runner on 3rd and a batted ball down the 1st base line such that the PU has a fair/foul call out in right field, who has the tag-up on R3? Unfortunately, this is taught two ways. The professional manual (PBUC, but now called Manual for the Two-Umpire System) says that PU still has the tag-up on R3, so he must see the call in the outfield, then swivel quickly to get the tag-up at third. However, a great many organizations teach that once the PU calls "I've got the line!", then he's handing off responsibility for the tag-up at third to U1.
The upshot: You must pre-game this with your partner in advance of the game so you're both on the same page.
Base Umpire (U1)
- Catch/no-catch in the cone.
- Slide in the working area. You have the batter-runner all the way to third base. You have R1 into second (PU has R1 into third).
- You have all base touches on first and second, and on batter-runner into third if he goes that far.
Plate Umpire (PU)
- If the batted ball is toward the first or third base lines, you have the fair/foul call and the catch/no-catch call. Position yourself on the appropriate line for the call.
- Then move toward third base in the event R1 advances to third. You have the play on R1 at third. If R1 continues home, you have the call on R1 at home.
- If there are runners on both first and third, you must see the base touch at home before moving to third. You also have the tag-up on R3.
5. U1 in C – Ball to the Infield
All you have to learn is setting up in A for no runners on and setting up in B with R1 or R1, R3. For every other configuration you're in C.
Important: There is one very important thing that all of these configurations have in common: They all show a runner in scoring position. Because of this, the PU will stay home. That is, his sole responsibility is at home plate and he will not rotate. U1 in C has all runners at all bases.
Because the PU is staying home and U1 stays in the working area, the rotation in the animation appears rather simple. While the appearance is true, don't be deceived. There is a lot going on, particularly if there are multiple runners, and U1, particularly, has a lot on his hands..
Base Umpire (U1)
- Slide in the working area as necessary.
- You have all runners at all bases. That includes tags and touches.
Plate Umpire (PU)
- Remain point of plate, then move, as necessary, to third base line extended (3BLX) for plays at the plate.
- You have all plays at the plate
- You have all touches and tags at third base.
- You have fair/foul on both base lines; if necessary, position yourself on the appropriate foul line for the fair/foul call.
6. U1 in C – Ball to Outfield
U1 is in C in all other base-running configurations – that is, with the following:
- Runner on 2nd (R2)
- Runner on 3rd (R3)
- Runners on 1st and 2nd (R1, R2)
- Runners on 2nd and 3rd (R2, R3)
- Bases loaded
Base Umpire (U1)
- Slide in the working area as necessary.
- You have all runners at all bases. That includes tags and touches.
- You have catch/no-catch in the cone.
Plate Umpire (PU)
- Remain point of plate, then move, as necessary, to third base line extended (3BX) for plays at the plate.
- You have all plays at the plate
- You have all touches and tags at third base.
- You have fair/foul on both base lines; if necessary, position yourself on the appropriate foul line for the fair/foul call.
- You have catch/no-catch on fly balls that are moving the left or right fielder toward their respective foul lines.